|
| Command: |
 Tools > Spectral Collection Tools > Spectral Collection |
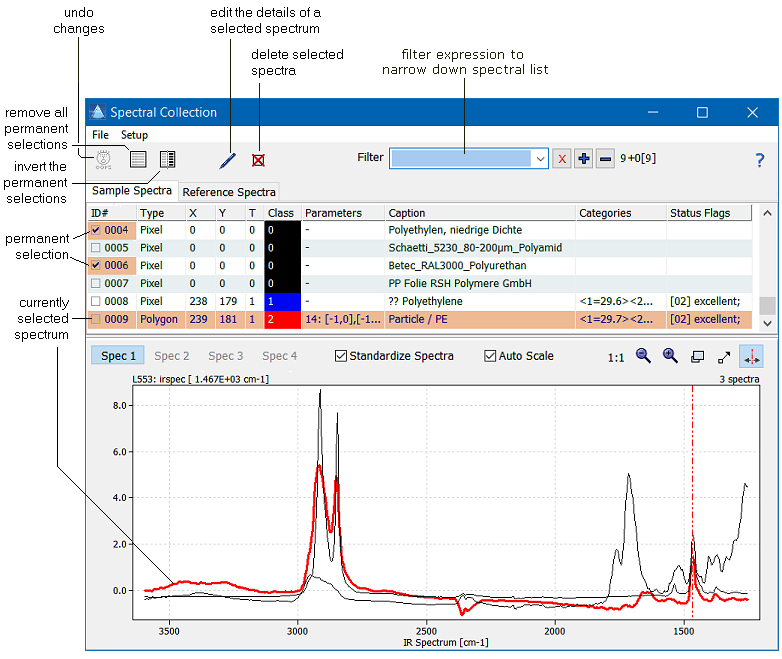
Sometimes it is convenient to store spectra of selected pixels or mean spectra of particular areas for later use. Epina ImageLab supports this by offering spectral collections which are linked to a particular dataset. Each dataset contains exactly one spectral collection. A spectral collection can only contain spectra of the associated dataset.
The spectral collection can store three types of spectra: (1) single pixel spectra, (2) mean spectra obtained from a center pixel and the pixels in a circular area around this pixel, and (3) mean spectra of an arbitrary contiguous region which is defined by a user drawn polygon. Please note that the spectra stored in spectral collections are actually stored in the collection (in contrast to bookmarks which are only pointers to particular pixels). This means that an entry of the spectral collection always reflects the state of the spectrum at the time when it has been added to the collection, later changes are not reflected unless you add the changed spectra as well.
Each spectrum in the spectral collection is augmented by additional information, such as the type of the spectrum, a caption, a class number, user-defined categories and user-defined flags. This additional information can be used to retrieve specific spectra from the collection later-on.
Spectra can be added to the spectral collection in the following ways:
- 2D Imager: click the "add to spectral collection" button
 in order to add a particular spectrum to the collection. in order to add a particular spectrum to the collection.
- Dataset Editor: you can add the entire set of specified data points, including the class information.
- Principal Component Analysis: you can add marked spectra by using the context menu of the PCA scores plot.
- Import individual spectra: use one of the commands "File > Import ..." and select one or more suitable files on your harddisk. Imported spectra will be stored as reference spectra exhibiting a default class of 127. Reference spectra are displayed in the table on the tab "Reference Spectra".
The collected spectra are displayed both in tabular and graphic form. In the collection table you can select any spectrum by clicking the corresponding line. Further you can make a selection permanent by ticking the checkbox in the first column of the table. All selected spectra are displayed in the spectral window below the table, the current selection is always displayed using a thicker line. In order to edit the properties of the selected spectra you have to click the edit button  . You can delete the selected spectra by clicking the delete button . You can delete the selected spectra by clicking the delete button  . .
The spectral collection editor provides the following controls:
Command Menu
| File > Export as Text File |
Exports the selected spectra of the collection as a CSV file. See Export of Spectral Collection Data for details.
|
| File > Export as Training/Test Dataset |
This command generates a training or test daseset from selected spectra of the spectral collection. The generated dataset can be opened by the Dataset Editor.
|
| File > Import JCAMP/DX |
You can import one or more reference spectra in JCAMP/DX format by using this command. Imported reference spectra always receive zero coordinates (X/Y/T) and have the type "Reference" assigned to it. Reference spectra are displayed in the table on the tab "Reference Spectra". |
| File > Import ENVI SLI |
This command allows to import an ENVI spectral library. After opening the library you have to select which spectra to import and the type of spectra (the ENVI format does not fully specify the type of the spectra, thus you have specify it manually). Imported reference spectra always receive zero coordinates (X/Y/T) and have the type "Reference" assigned to it. Reference spectra are displayed in the table on the tab "Reference Spectra".
Hint: please ensure that the data part of the ENVI library has either the file extension '.sli' or '.esl'. |
| File > Import Renishaw WiRE |
Import a spectrum in WiRE format (as defined by Renishaw). Imported reference spectra always receive zero coordinates (X/Y/T) and have the type "Reference" assigned to it. Reference spectra are displayed in the table on the tab "Reference Spectra". |
| File > Import From Another Collection |
This command allows to load reference spectra from another specral collection. After activating this command you have to select the spectra to be imported by ticking the corresponding check boxes. |
| Spectra > Edit Selected Spectra |
Edit the properties of the selected spectra. See Property Editor of Spectral Collections for details.
|
| Spectra > Delete Selected Spectra |
Deletes the selected spectra after confirmation. |
| Spectra > Add Selected Spectra to Database |
Adds the selected spectra to a database of your choice. After activating this command you have to select the database and a few additional parameters. See Add Spectral Collection Data to a Database for details.
|
| Spectra > Copy Captions of Selected Spectra to Category |
Creates a category "caption" and copies the text of the captions into this category. Please note that this command is only available from the context menu of the spectral list.
|
| Setup > Edit Flag Names |
Edit or define the identifiers of the state flags (see section State Flags in Spectral Collections for more). |
| Setup > Edit Class Names |
Edit or define the class names and the unique class identifiers. See the section Class Names and Unique Class Identifiers for details. |
| Setup > Categories |
You can define new categories, or edit or delete existing ones. See the section Definition of Categories for details. |
|
|
| Hint: |
Please note that in the case of multisensor images the collected spectra always consist of the entire set of spectra (i.e. a collected spectrum actually consists of several spectra). In the case you extend the data cube later-on the new parts of the data cube are not updated in the spectral collection (the spectral collection actually stores the current spectrum as it is when you press the "Add" button). |
|
 Tools
Tools